










Conducting a comprehensive night sky quality survey is critical for assessing light pollution and is required for many DarkSky certification programs, including International Dark Sky Places.
There are several approaches to conducting a night sky quality survey. This guide provides an overview to help you get started, exploring the most common methods and techniques, including:

The Unihedron Sky Quality Meter-Lens (SQM-L) is the most widely used device for taking scientific-quality measurements of sky brightness. This small, battery-powered device is available directly from the manufacturer.
The SQM-L is easy to use: Simply hold the device above your head, point the photometer at the zenith (straight up), and push the button. The screen will then display the sky brightness at that point in astronomer units (magnitudes per square arcsecond, or mpsas). This unit is somewhat counterintuitive in that the higher the number, the darker the sky is. Take at least six measurements per location per visit, discarding the first measurement. Report all of the measurements.
Never take a measurement directly underneath a light source or anything that might block the clear sky. Always take measurements with a clear, open sky without cloud cover, to prevent any sky glow measurements that will deter the accuracy of the device. Also, always take measurements when the moon is below the horizon. Measurements taken while the moon is visible will not accurately reflect the natural darkness of your location.
Similarly, keep in mind the impact of twilight on your measurements. Only take readings under conditions of astronomical darkness, meaning that the sun is at least 18º below the local horizon. Good sources of information for the times of the beginning and end of astronomical twilight at your location on any given night can be found here. (Note that for these calculators you may need to know your latitude, longitude, and local time zone offset from GMT.)
It is essential to include areas in the survey that represent the darkest, brightest, and most accessible areas to visitors to achieve a comprehensive survey. This data can then be organized into a map and corresponding table showing approximate locations and readings of measurements. An example map and table are provided below. Advocates are encouraged to use DarkSky’s standardized spreadsheet when taking measurements out in the field or compiling measurements taken throughout the course of a year. Directions for access and edits are provided at the top of each spreadsheet.
If you are able, upload your data to community science programs like Globe at Night to further help scientists track night sky quality across the world. Data from dark sites, and especially communities, are essential in monitoring this natural resource and the presence and intensity of light pollution globally. When reporting data to this application, you can indicate that this is a measurement made in support of DarkSky advocacy by adding the string “IDA” to the ‘Location comments’ section on the Globe At Night form. For measurements made in support of International Dark Sky Places Program nominations, add the string “IDSP” to the same section.
The Bortle Dark-Sky Scale provides an estimate of night sky brightness and helps illustrate how light pollution affects the visibility of celestial objects and phenomena. Lower Bortle numbers indicate darker skies and better observing conditions. One of the easiest ways to estimate your Bortle class is to follow the descriptive flow chart below. If sky brightness varies across your area, you may need to repeat this process at multiple locations.

New to stargazing? No problem. There are many excellent beginner’s guides and educational resources available to help you develop amateur astronomy skills and learn how to identify stars, constellations, and deep-sky objects.
You may also find it helpful to connect with local astronomy clubs, amateur astronomers, DarkSky Chapters, or DarkSky Advocates, many of whom can provide guidance and support for night sky observations and monitoring efforts.
Documenting nighttime phenomena with photography provides verification that the quantitative SQM-L measurements are accurate. Photographs also help document whether light domes are visible along the horizon, which the SQM-L device may not detect.
When providing images to DarkSky, include a breakdown of the camera details used to take it, such as exposure time, focal length, and ISO speed. (See the example below.)
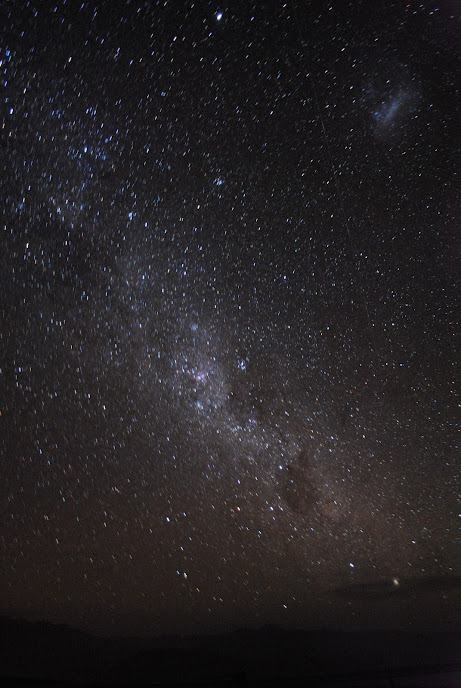
| Photographer: | Ameé Hennig |
| Location: | Cerro Pachón, near SOAR Telescope in Chile (GPS location if available) |
| Phenomenon Shown: | Milky Way, Large Magellanic Cloud |
| Camera: | NIKON D3000 |
| Exposure: | 17.5 sec (1/0) |
| Aperture: | f/3.5 |
| Focal Length: | 18 mm |
| ISO Speed: | 1600 |
| Special Editing: | None |
These methods in unison have proven successful in providing quantitative data and qualitative assessments of the night sky. If you have additional questions, please contact the Director of Conservation.